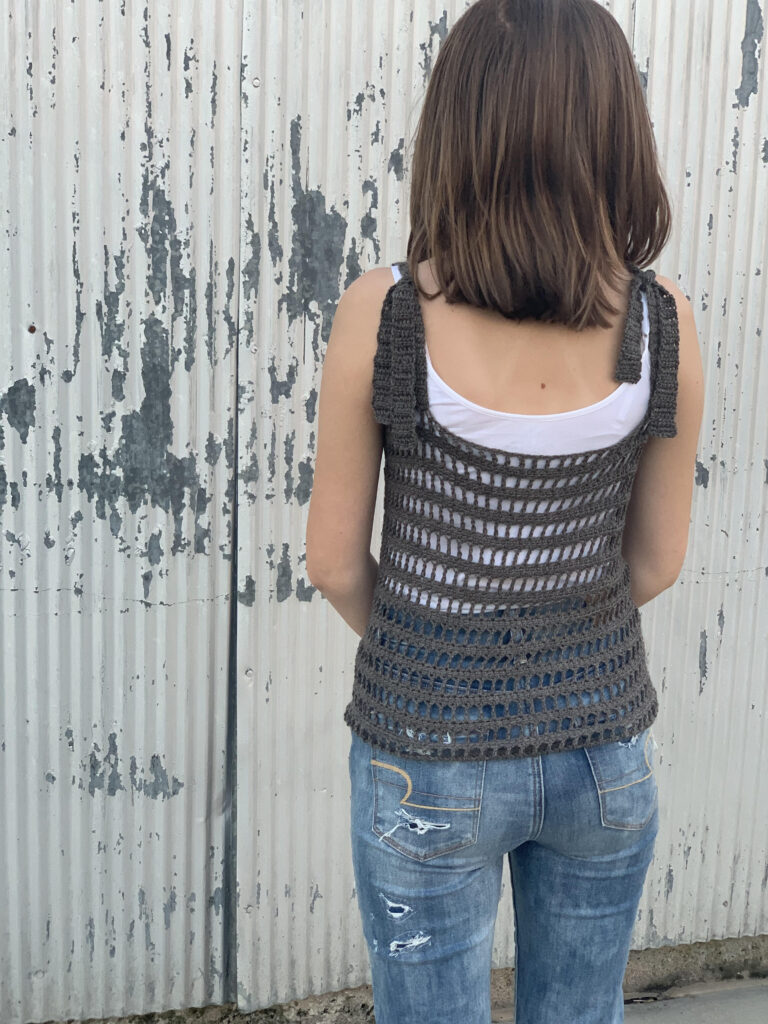
July is wrapping up and I’m releasing my final summery pattern of 2020! This one was a joy to work on, and I hope you will enjoy making it just as much as I did.
This is the first garment I have ever made with fingering weight yarn. Now – I picked a really easy way to do it – this pattern is primarily made up of double and treble crochet. So you get all the awesome drape of fingering weight yarn without building it out of small stitches. The yarn I used for this is Stroll Fingering from WeCrochet in the colorway Jack Rabbit Heather. This color is what I would describe as a grey – brown. It’s a beautiful neutral to have in your stash.
If you enjoy this free pattern, please consider purchasing the ad free pdf on Etsy or Ravelry.
THE PATTERN
Materials:
430 (500, 570, 640, 750, 800, 880, 950, 990) yards, sample uses WeCrochet Stroll, Fingering weight, 75% Superwash Merino, 25% Nylon blend
H (5.0 mm) crochet hook, or size needed to get gauge.
Locking stitch marker
Blocking supplies
Gauge:
15 sts x 8 rows, alternating rows of linked dc and tc = 4” blocked
Pattern Notes:
•Pattern is written in size XS with changes for sizes S, M, L, XL, 2X, 3X, 4X, and 5X following in parentheses. Model is wearing size XS.
•Finished bust measurements are 32 (36, 40, 44, 48, 52, 56, 60, 64)”
•Top is written to include 2” positive ease through the bust. To choose your size, measure your bust at the fullest point and choose the size that is 2 – 3” inches larger.
•Ch 1 or ch 3 at the beginning of a row does not count as a st.
•Stitch counts are indicated in < > where there is a change.
•For bust shaping, it may be helpful to mark the first st of each row with a sm so you can clearly identify it on the next row.
Special Stitches:
Linked dc – Insert hook into front bar of previous dc,* yo, pull up a loop, insert hook into next st, yo, pull up a loop, yo, pull through two loops on hook, yo pull through remaining two loops.
-For initial linked dc of a row, insert hook into the 2nd ch of your ch 3, then proceed from *.
Abbreviations (US Terms):
ch chain
sc single crochet
hdc half double crochet
fhdc foundation half double crochet
dc double crochet
Tc treble crochet
sp space
sm stitch marker
sk skip
st(s) stitch(es)
rs right side
ws wrong side
* * repeat instructions between asterisks as many times as directed
Front Panel:
Row 1 (rs): Fhdc 67 (75, 83, 91, 99, 107, 115, 123, 131), turn. <67, 75, 83, 91, 99, 107, 115, 123, 131> hdc
Row 2 (ws): Ch 3, *tc 1, ch 1, sk 1*, repeat from * to * across, turn. <34, 38, 42, 46, 50, 54, 58, 62, 66> tc
Row 3: Ch 3, linked dc in every st and ch sp across, turn. <67, 75, 83, 91, 99, 107, 115, 123, 131> linked dc
Rows 4 – 25: Repeat rows 2 – 3.
Row 26: Repeat row 2.
Additional repeats may be added here to lengthen your piece before shaping for bust area, but be sure to end on a row 2 repeat.
Right front shaping:
Place a sm in the 32 (36, 40, 44, 48, 52, 56, 60, 64) st from the both the right and left sides of your top. These should be ch sp, and you should have a tc, ch 1, tc between the two sm.
Row 1: Ch 1, sk 1, sc 1, hdc 1, dc 1, linked dc until 3 sts remain to sm, dc1, hdc 1, sc 1, turn. <31, 35, 39, 43, 47, 51, 55, 59, 63> sts
Row 2: Ch 1, sk 1, sc 1, hdc 1, dc 1, ch 1, sk 1, *tc 1, ch 1, sk 1*, repeat from * to * until 4 sts remain, dc1, hdc 1, sc 1, turn. <11, 13, 18, 20, 22, 24, 26, 28, 30> tc
Row 3: Ch 1, sk 1, sc 1, hdc 1, dc 1, linked dc until 3 sts remain to sm, dc1, hdc 1, sc 1, turn. <27, 31, 35, 39, 43, 47, 51, 55, 59> sts
Row 4: Ch 1, sk 1, sc 1, hdc 1, dc 1, ch 1, sk 1, *tc 1, ch 1, sk 1*, repeat from * to * until 4 sts remain, dc1, hdc 1, sc 1, turn. <12, 14, 16, 18, 20, 22, 24, 26, 28> tc
Row 5: Ch 1, sk 1, sc 1, hdc 1, dc 1, linked dc until 3 sts remain to sm, dc1, hdc 1, sc 1, turn. <23, 27, 31, 35, 39, 43, 47, 51, 55, 59> sts
Row 6: Ch 1, sk 1, sc 1, hdc 1, dc 1, ch 1, sk 1, *tc 1, ch 1, sk 1*, repeat from * to * until 4 sts remain, dc1, hdc 1, sc 1, turn. <10, 12, 14, 16, 18, 20, 22, 24, 26> tc
Row 7: Ch 1, sk 1, sc 1, hdc 1, dc 1, linked dc until 3 sts remain to sm, dc1, hdc 1, sc 1, turn. <19, 23, 27, 31, 35, 39, 43, 47, 51, 55> sts
Row 8: Ch 1, sk 1, sc 1, hdc 1, dc 1, ch 1, sk 1, *tc 1, ch 1, sk 1*, repeat from * to * until 4 sts remain, dc1, hdc 1, sc 1, turn. <8, 10, 12, 14, 16, 18, 20, 22, 24> tc
Row 9: Ch 1, sk 1, sc 1, hdc 1, dc 1, linked dc until 3 sts remain to sm, dc1, hdc 1, sc 1, turn. <15, 19, 23, 27, 31, 35, 39, 43, 47> sts
Row 10: Ch 1, sk 1, sc 1, hdc 1, dc 1, ch 1, sk 1, *tc 1, ch 1, sk 1*, repeat from * to * until 4 sts remain, dc1, hdc 1, sc 1, turn. <6, 8, 10, 12, 14, 16, 18, 20, 22> tc
Row 11: Ch 1, sk 1, sc 1, hdc 1, dc 1, linked dc until 3 sts remain to sm, dc1, hdc 1, sc 1, turn. <11, 15, 19, 23, 27, 31, 35, 39, 43> sts
Size XS/S proceed to Right Front Strap
Row 12: Ch 1, sk 1, sc 1, hdc 1, dc 1, ch 1, sk 1, *tc 1, ch 1, sk 1*, repeat from * to * until 4 sts remain, dc1, hdc 1, sc 1, turn. <X, X, 8, 10, 12, 14, 16, 18, 20> tc
Row 13: Ch 1, sk 1, sc 1, hdc 1, dc 1, linked dc until 3 sts remain to sm, dc1, hdc 1, sc 1, turn. <X, X, 15, 19, 23, 27, 31, 35, 39> sts
Size M/L proceed to Right Front Strap
Row 14: Ch 1, sk 1, sc 1, hdc 1, dc 1, ch 1, sk 1, *tc 1, ch 1, sk 1*, repeat from * to * until 4 sts remain, dc1, hdc 1, sc 1, turn. <X, X, X, X, 10, 12, 14, 16, 18> tc
Row 15: Ch 1, sk 1, sc 1, hdc 1, dc 1, linked dc until 3 sts remain to sm, dc1, hdc 1, sc 1, turn. <X, X, X, X, 19, 23, 27, 31, 35> sts
All remaining sizes proceed to Right Front Strap
Right Front Strap:
Row 1: Ch 3, dc2tog, dc2tog, linked dc until 4 sts remain, dc2tog, dc2tog, turn. <7, 7, 11, 9, 15, 19, 23, 27, 31> dc
Sizes M, XL, 2X, 3X, 4X, 5X only repeat row 1 (1, 2, 3, 4, 5, 6) times, then proceed to row 3.
Size L only:
Row 2: Ch 3, dc2tog, linked dc until 4 sts remain, dc2tog, turn. <7> dc
All sizes should now have 7 sts for their strap.
Row 3: Ch 3, linked dc across, turn.
Rows 4 – 18: Repeat row 3.
Fasten off.
Left Front Shaping:
Attach yarn in second marked st, with rs facing you. Repeat all instructions as for the Right Front Shaping, and Right Front Strap.

Back Panel:
Row 1 (rs): Fhdc 67 (75, 83, 91, 99, 107, 115, 123, 131), turn. <67, 75, 83, 91, 99, 107, 115, 123, 131> hdc
Row 2 (ws): Ch 3, *tc 1, ch 1, sk 1*, repeat from * to * across, turn. <34, 38, 42, 46, 50, 54, 58, 62, 66> tc
Row 3: Ch 3, linked dc in every st and ch sp across, turn. <67, 75, 83, 91, 99, 107, 115, 123, 131> linked dc
Rows 4 – 25: Repeat rows 2 – 3.
Row 26: Repeat row 2.
If you added additional repeats for the front panel, you will want to do the same number here of repeats here.
Back Straps (repeat for each side):
Row 1: Join yarn at first st on edge, slst 12 (14, 16, 18, 20, 22, 24, 26, 28), ch 3, linked dc 7, turn. <7 dc>
Row 2: Ch 3, linked dc across, turn.
Rows 3 – 24: Repeat row 2.
Fasten off
Finishing:
Weave in all ends. Block your pieces according to your preference, ensuring they are both the same width. Using your preferred seaming method, seam the front and back panels together, lining up the rows as you go. You may choose to use stitch markers to hold your panels together. Tie your straps over each shoulder, and you’re good to go! Use the hashtags #gradytank and #hookedhazel when you share your makes so I can see and share them!


