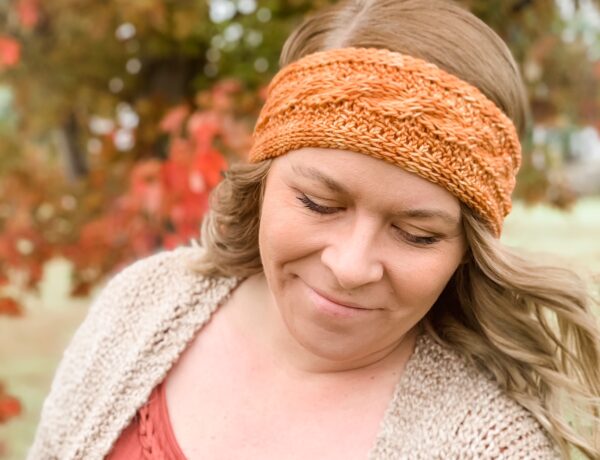
Have some DK weight scraps you’re looking to use up? The Color Melt Headband has you covered! All you need is approximately 45 yards each of two colors and a 6 mm (J) hook. Keep reading for the free crochet headband pattern!
I designed the Color Melt Headband to use up all the scrap yarn from my Color Melt Cowl. If you’re anything like me, you hate seeing beautiful handdyed yarn go to waste, right? I know I do.
I made mine with yarn from Montana Crochet – the colorways shown are Chokecherry and Scarlett Spice. The colors are complimentary, but this headband would also look great in contrasting colors. The stitches create a vertical stripe effect that isn’t super apparent when you use two colors that are complimentary – but they’d be bold if you when with a combo like black and white!

The Color Melt Headband utilizes simple stitches and construction – making it a perfect project for crocheters of any skill level! Because it uses such small amounts of yarn – only 45 yards each of two colors – this headband is a great stash buster for any DK weight yarn you’ve been saving. I hope you love this pattern – if you make one I’d love to see it on Instagram! Just use the hashtag #colormeltheadband. I always enjoy seeing and sharing your work!
Gather your supplies:
- 6 mm (J) crochet hook
- 2 colors of DK weight yarn, 45 yards each
- Darning needle
- Scissors
Gauge:
4” x 4” 18 sts by 18 rows in *sc 1, ch 1, sk 1*, unblocked.
Notes:
You will use two colors for this piece. Each section indicates which color to use.
This pattern uses moss stitch, where sc are worked into ch sts and vice versa.
Abbreviations used:
st stitch
ch chain
slst slip stitch
fsc foundation single crochet
sc single crochet
sk skip
sp space
The Pattern:
Start rounds 1 & 2 leaving a long tail of yarn, approximately 12”. These will later be used to cinch and wrap the center. For a wider headband, add extra round repeats before finishing with the round of sc (round 19). I recommend trying this on after round 2 or 3. If it’s too tight, you can frog back and add stitches in multiples of 2 to round 1. Remember that moss stitch will pull in your work a bit in relation to your foundation round.
With Color A:
Round 1: Fsc 80. Being careful not to twist your foundation row, join with a slst to form a circle. Ch 2, turn. (80 sc)
With Color B:
Round 2: Sk 1, *sc 1, ch 1, sk 1*, repeat from * to * around until one st remains, sc 1. Join with a slst into ch 2 sp. Ch 2, turn. (40 sc, 40 ch 1 sp)
With Color A:
Round 3: Sk 1, *sc 1, ch 1, sk 1*, repeat from * to * around until one st remains, sc 1. Join with a slst into ch 2 sp. Ch 2, turn. (40 sc, 40 ch 1 sp)
Rounds 4 – 17: Repeat round 2 – 3. (40 sc, 40 ch 1 sp)
With Color B:
Round 18: Sk 1, *sc 1, ch 1, sk 1*, repeat from * to * around until one st remains, sc 1. Join with a slst into ch 2 sp. Ch 1, turn. (40 sc, 40 ch 1 sp)
With Color A:
Round 19: Sc into each st and ch sp around. Join with a slst into first st. (80 sc)
Break yarn, leaving approximately 12” yarn tails. Do not weave in ends.
Finishing:
Take the two yarn tails from rounds one and two, and tie them into a knot with the tails from your last two rounds. Pull the knot taught, which will create the cinched look in the center. Then, take all four ends and wrap them several times around the cinched area, at the same time covering your seam. Continue to wrap your tails until you achieve your desired look. Weave in all ends and block if desired.
Before you go…
You are welcome to sell finished items created with this pattern. I only ask that you credit Hooked Hazel with the original design. Do not use my photos to sell finished products. Do not copy, alter, or distribute this pattern.
I would appreciate your review on Etsy, Ravelry, or Instagram. Tag me in photos, and I may feature your project! Use the hashtags #hookedhazel and #colormeltheadband to possibly be featured!


