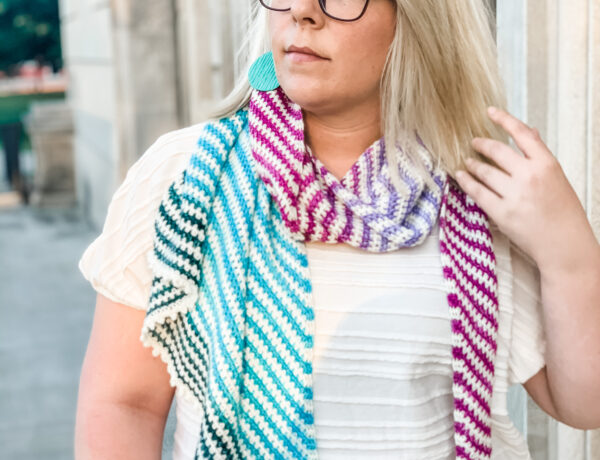
Spring is finally here, can you believe it? I was beginning to feel like winter would never end! One of my favorite things about spring is wearing light layers. I’m always a fan of scarves, and spring is the perfect time to toss on a triangle scarf for a little added warmth or pop of color to an outfit.
This post may contain affiliate links, from which I receive a small commission but are no extra charge to you.
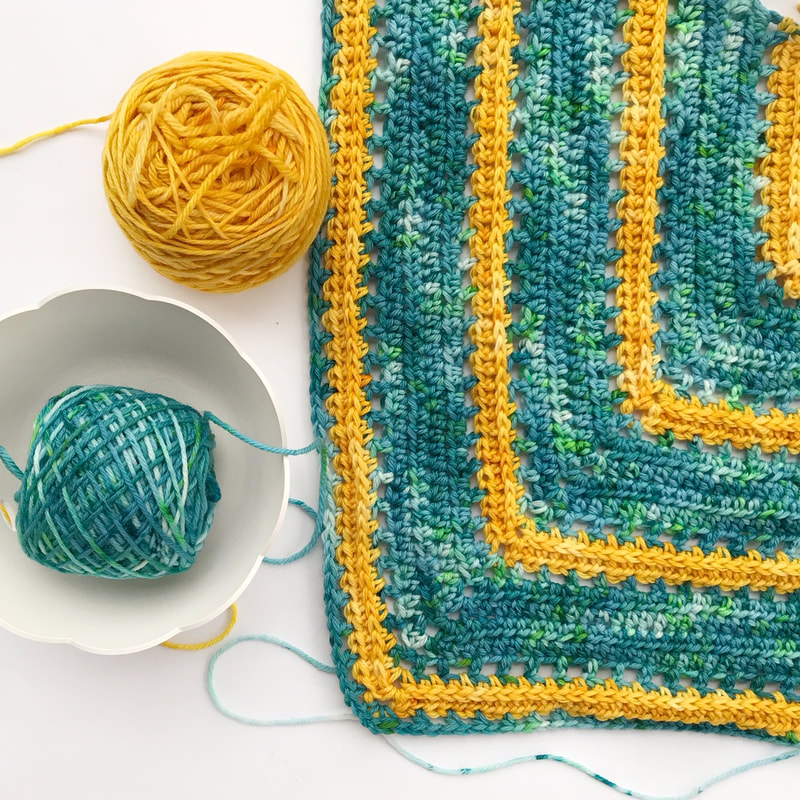
I’m really excited to share with you the Easter Sunday Shawlette pattern. This piece is especially dear to me because I created it with handdyed yarn from two of my favorite indie dyers (and friends!). The beautiful teal/blue/green yarn is from WildWoodDesignsME. Caitlin is one of the first people I really got to know on Instagram, and she’s an incredibly talented dyer and crocheter. I love the bright color combinations she comes up with! The gorgeous yellow wool is from Janine at Windmill Fibres. Janine has just recently started her dyeing journey, and she already has some of the most beautiful hanks of yarn I’ve ever seen!
My inspiration for this design was pretty simple. I tend to accumulate a bunch of single skeins from indie dyers. I always like to support my friends creative endeavors, so I have a lot of one off hanks of yarn! Many of them compliment one another in color, since I gravitate to similar color palettes (you know I love a good yellow). I started thinking, what can I make using just one skein of yarn from couple of different dyers? I hunted through my stash and found these two skeins. I wanted to make something simple, that would highlight the colors in each hank.
The below pattern is offered here for free, but if you would like the reduced cost, ad free version, you can find it in my Ravelry shop.
For this shawlette, you will need the following supplies:
DK weight yarn, 240 yards of the MC and 160 yards of the CC
5.5 mm crochet hook (I love these hooks from Clover)
Yarn needle
Abbreviations used:
Ch – Chain
Hdc – half double crochet
Sk – skip
Slst – slip stitch
Cs – camel stitch (hdc in third loop)
St – stitch
MC – main color
CC – contrasting color
Gauge: 16 hdc x 12 rows = 4″ square
Special stitch – Picot. In same stitch, ch 3, then slst into first ch st.
Ch 3 at the beginning of a row counts as a hdc plus ch 1.
Note: take care when switching colors. Pulling too tight will result in the upper edge sloping down rather than lying straight. If your upper edge does slope slightly, this can be resolved with blocking.
The Pattern:
Begin with MC and a magic circle.
R 1: Ch 3, hdc 3, ch 2, hdc 3, ch 1, hdc 1. Turn. 8 hdc
R 2: Ch 3, hdc in ch 1 sp, hdc in each st to ch 2 sp, [hdc, ch 2, hdc] in ch 2 sp, hdc in each st to ch 1 sp, [hdc, ch1, hdc] in sp. Turn. 12 hdc.
R 3 – 5: Repeat R 2. 24 hdc.
R 6: Ch 3, hdc in ch 1 sp, ch 1, sk 1, *hdc 1, ch 1, sk 1*. Repeat from * to * until you reach the ch 2 sp in the middle, [hdc, ch 2, hdc] in ch 2 sp, hdc 1, *ch 1, sk 1, hdc*. Repeat from * to * until you reach the final ch 1 sp, [hdc, ch 1, hdc] in ch sp. Turn. 16 hdc.
Switch to CC.
R 7: Ch 3, hdc in ch 1 sp, hdc in each ch sp and st to ch 2 sp, [hdc, ch 2, hdc] in ch 2 sp, hdc in each st and ch sp to final ch 1 sp, [hdc, ch 1, hdc] in ch sp. Turn. 32 hdc.
R 8: Ch 3, 2 hdc in ch 1 sp, cs in each st to ch 2 sp, [hdc, ch 2, hdc] in ch 2 sp, cs in each st to final ch 1 sp, [hdc, ch 1, hdc 2] in ch sp. Turn. 38 hdc.
Switch to MC
R 9: Ch 3, hdc in ch 1 sp,*hdc 1, ch 1, sk 1*. Repeat from * to * until you reach the ch 2 sp in the middle, [hdc, ch 2, hdc] in ch 2 sp, *ch 1, sk 1, hdc*. Repeat from * to * until you reach the final ch 1 sp, [hdc, ch 1, hdc] in ch sp. Turn. 24 hdc.
R 10: Ch 3, hdc in ch 1 sp, hdc in each ch sp and st to ch 2 sp, [hdc, ch 2, hdc] in ch 2 sp, hdc in each st and ch sp to final ch 1 sp, [hdc, ch 1, hdc] in ch sp. Turn. 46 hdc.
R 11 – 13: Ch 3, hdc in ch 1 sp, hdc in each st to ch 2 sp, [hdc, ch 2, hdc] in ch 2 sp, hdc in each st to ch 1 sp, [hdc, ch1, hdc] in sp. Turn. 58 hdc
R 14: Ch 3, hdc in ch 1 sp, ch 1, sk 1, *hdc 1, ch 1, sk 1*. Repeat from * to * until you reach the ch 2 sp in the middle, [hdc, ch 2, hdc] in ch 2 sp, hdc 1, *ch 1, sk 1, hdc*. Repeat from * to * until you reach the final ch 1 sp, [hdc, ch 1, hdc] in ch sp. Turn. 34 hdc.
Switch to CC.
R 15: Ch 3, hdc in ch 1 sp, hdc in each ch sp and st to ch 2 sp, [hdc, ch 2, hdc] in ch 2 sp, hdc in each st and ch sp to final ch 1 sp, [hdc, ch 1, hdc] in ch sp. Turn. 66 hdc.
R 16: Ch 3, 2 hdc in ch 1 sp, cs in each st to ch 2 sp, [hdc, ch 2, hdc] in ch 2 sp, cs in each st to final ch 1 sp, [hdc, ch 1, hdc 2] in ch sp. Turn. 72 hdc.
R 17 – 40, Repeat R 9 – 16.
R 41: Repeat R 9.
R 42: Repeat R 10.
Switch to CC
R 43: Repeat R 15
R 44: Ch 3, hdc in ch sp, *cs 2, picot*. Repeat from * to * until you reach ch 2 sp, [hdc, ch 2, hdc] in ch 2 sp, *picot, cs 2*. Repeat from * to * until you reach the final ch 1 sp, [hdc, ch 1, hdc in ch sp].
Bind off and weave in ends. Block your finished piece before wearing.
You are welcome to sell finished items created with this pattern. I only ask that you credit Hooked Hazel with the original design. Do not use my photos to sell finished products. Do not copy, alter, or distribute this pattern.