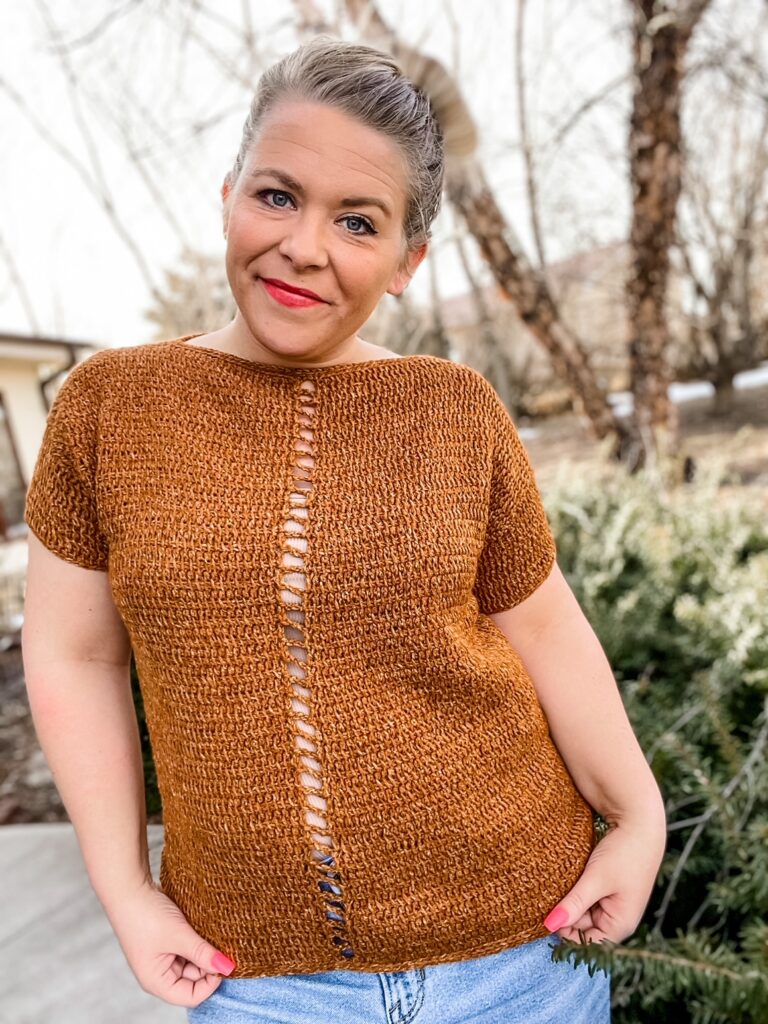
I love playing around with new to me stitches and making little swatches. Is that something you ever do? As you might know already, I’ve gotten really into Tunisian Crochet over the last few years. I really like experimenting with different stitches and combinations. Sometimes my swatches turn into whole projects – like the Double Tunisian Tee! I fell so in love with tds (tunisian double stitch) that I decided to make a sweater with it. This free crochet pattern is such a fun spring sweater! It has a cute center detail on the front and back that I think takes it up a level from being too simple.
The Stitch
For the Double Tunisian Tee, I used tds. The tunisian double stitch is REALLY similar to traditional double crochet. You’ll pick it up in a flash! Here’s how you do it:
YO, insert hook from right to left under vertical bar of indicated st, YO, pull up a loop, YO, pull through 2 loops.
Pretty simple, right? One thing to keep in mind is this stitch, like many tunisian stitches, leans to the right. I combatted this in the Double Tunisian Tee by aggressively wet blocking my finished top. Another option is every other row, skip your first stitch, and work two tds in your last stitch. I’d definitely swatch this option before committing to it. It works, but on some yarns can look a little “holey”.
Construction
This fun tunisian crochet sweater is made of four panels that are worked flat and then joined. I made a video to help you with seaming and offering a few of my tricks, you can see it below!
The Yarn
I used one of my all time favorite yarns for this pattern, Lion Brand Jeans in Top Stitch! I use this yarn quite often, I love the weathered look and it is soooo soft! It can be a bit splitty, so definitely be aware of that.
Love Tunisian Crochet?
If you want to try more tunisian crochet projects, check out some of my other free patterns below!

Free Tunisian Crochet Spring Sweater Pattern
I love playing around with new to me stitches and making little swatches. Is…
March 23, 2022
Tunisian Scrap Cowl – Free Crochet Pattern
Learn how to make a tunisian crochet cowl using yarn scraps from your stash!
October 31, 2021
XO Tunisian Square
Hi friends! Today I’m super excited to share with you my square for the…
May 26, 2021The Pattern
The full free pattern is below. I hope that if you enjoy this one you will review it on Ravelry or share on social media with the hashtag #doubletunisiantee.
Materials and Notions Needed
- Tunisian crochet hook – 5.0 mm or size needed to meet gauge.
- Worsted weight yarn, sample uses Lion Brand Jeans. Yardage required is 668 (760, 850, 940, 1040, 1130, 1220, 1320, 1410) yards.
- Blocking materials – this is important. The stitch used in this top leans to the right and it will be necessary to either wet block or steam block your panels.
- Darning needle
- Scissors
- Locking stitch markers (optional, may be used for seaming if desired
Measurements
Pattern is written for nine sizes, with finished bust measurements being as follows:
30 (34, 38, 42, 46, 50, 54, 58, 62)”. You will want to choose a size 1 – 4″ larger than your bust. The sample shown is size 42″ while the model has a bust measurement of 39″.
Gauge
17.5 sts x 7 rows in tunisian double crochet
Abbreviations
ch – chain
FwP – forward pass
RetP – return pass
tds – tunisian double crochet
st(s) – stitch(es)
YO – yarn over
RS – right side
slst – slip stitch
Notes
- Top is worked flat as four panels, which are then seamed together.
- The tds stitch leans to the right naturally. Because of this, some method of blocking will be necessary. I recommend pinning and steam blocking acrylic, or wet blocking natural fibres.
- All measurements are after finishing and blocking.
- St counts are indicated within < > where there is a change.
- Pattern is written in size XS with changes for sizes S, M, L, XL, 2X, 3X, 4X, and 5X following in parentheses.
- Sleeves are worked attached to the sides of the panels, flat, then seamed with the body.
- When working your finishing slst rounds, you may want to increase a hook size so your sts are not too tight. This will depend on your individual tension.
Pattern
Panels (make 4):
Ch 33 (37, 41, 47, 51, 56, 60, 64, 69)
Row 1: Tds in 3rd ch from hook (counts as one tds) and each ch across. <31, 36, 40, 45, 49, 54, 58, 62, 67>
RetP: YO, draw through one loop, YO, draw through two loops, repeat from * until one loop remains on hook.
Rows 2 – 38 (38, 38, 38, 40, 40, 40, 40, 40): Ch 2, tds in each vertical bar across, and tds in final st.
RetP: YO, draw through one loop, YO, draw through two loops, repeat from * until one loop remains on hook.
Bind off row: Slst in each vertical bar across, fasten off.
Block your four panels using your preferred method. I highly recommend wet blocking if possible.
Assembly for sleeves:
With RS facing in, take two of your panels and seam from the outer right edge 12 (17, 19, 24, 26, 31, 35, 37, 42) sts across the narrow ends. This will form the shoulder seams. You should have 19 (19, 21, 21, 23, 23, 23, 25, 25) sts not seamed. Repeat for the other pair of panels, working this time from the outer left edge.
Sleeves:
With RS facing up, join yarn in the end of the 26 (25, 25, 24, 23, 24, 24, 22, 22) row from the bottom edge of the pane, on the side that is seamed.
Row 1: Ch 1, 2tds in then ends of the next 12 (13, 13, 14, 15, 16, 16, 18, 18) rows (you should be at your shoulder seam), 2tds in the ends of the next 12 (13, 13, 14, 15, 16, 16, 18, 18) rows of the attached panel. 48 <52, 52, 56, 60, 64, 64, 72, 72>
RetP: YO, draw through one loop, YO, draw through two loops, repeat from * until one loop remains on hook.
Rows 2 – 6: Ch 2, tds in each vertical bar across, and tds in final st.
RetP: YO, draw through one loop, YO, draw through two loops, repeat from * until one loop remains on hook.
Bind off row: Slst in each vertical bar across, fasten off.
Repeat for opposite sleeve with other set of seamed panels.
Assembly:
With RS facing in, seam from the bottom outer edge, up the side seam and along the bottom of the sleeve. Repeat for other set of panels.
Joining:
You should now have two halves of a shirt. We will join these halves down the center front and back using slst and ch.
- With right sides facing you, and your two front centers aligned, join yarn with a slst in the top end st of the right panel.
- Ch 3, and slst into the top st on the left panel.
- Slst 2, ch 3, and join yarn 2 sts below the previous st on the right panel.
- Slst 2, ch 3, and join yarn 2 sts below the previous st on the left panel.
- Repeat steps 3 – 4 to the bottom of your top.
- Repeat for back of top.
Finishing
Join yarn at either side seam on the bottom, with RS facing you.
Round 1: Slst in each st around, including in the ch sts from your joins. <130, 150, 166, 186, 202, 222, 238, 254, 274>
Round 2: Slst blo in each st around.
Round 3: Slst blo in each st around.
Fasten off.
Join yarn at either side seam at the neck, with RS facing you.
Round 1: Slst in each st around, including in the ch sts from your joins. <82, 82, 90, 90, 98, 98, 98, 106, 106>
Round 2: Slst blo in each st around.
Round 3: Slst blo in each st around.
Fasten off.